Swing/BrickLayout のバックアップの現在との差分(No.19)
- category: swing
folder: BrickLayout
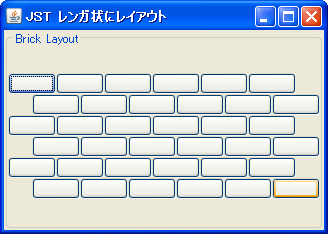
title: GridBagLayoutを使ってレンガ状に配置
tags: [GridBagLayout, LayoutManager]
author: aterai
pubdate: 2009-03-09T14:08:29+09:00
description: GridBagLayoutを使ってコンポーネントをレンガ状に配置します。
image:
概要
GridBagLayoutを使ってコンポーネントをレンガ状に配置します。Swing - GridBagLayout to create a boardを参考にしています。
Screenshot

Advertisement
サンプルコード
JPanel panel = new JPanel(new GridBagLayout());
panel.setBorder(BorderFactory.createTitledBorder("Brick Layout"));
GridBagConstraints c = new GridBagConstraints();
c.fill = GridBagConstraints.HORIZONTAL;
c.gridy = GridBagConstraints.RELATIVE;
for (int y = 0; y < YSIZE; y++) {
  ////c.gridy = GridBagConstraints.RELATIVE; //c.gridy = y;
  //int d = y & 0b1; //= y % 2 == 0 ? 0 : 1; //start x offset
  //if (d == 1) {
  //  c.gridwidth = 1;
  //  c.gridx = 0;
  //  panel.add(new JButton("a"), c);
  //}
  c.gridx = y & 0b1; //start x offset
  // // c.gridy = GridBagConstraints.RELATIVE; // c.gridy = y;
  // int d = y & 0b1; // = y % 2 == 0 ? 0 : 1; // start x offset
  // if (d == 1) {
  //   c.gridwidth = 1;
  //   c.gridx = 0;
  //   panel.add(new JButton("a"), c);
  // }
  c.gridx = y & 0b1; // start x offset
  c.gridwidth = WIDTH;
  for (int x = 0; x < XSIZE; x++) {
    panel.add(new JButton(" "), c);
    c.gridx += WIDTH;
  }
  //if (d == 0) {
  //  c.gridwidth = 1;
  //  panel.add(new JButton("c"), c);
  //}
  // if (d == 0) {
  //   c.gridwidth = 1;
  //   panel.add(new JButton("c"), c);
  // }
}
#spandel
//GridBagLayout to create a board
#spanend
#spandel
//https://community.oracle.com/thread/1357310
#spanend
#spandel
//<dummy-row>
#spanend
#spanadd
// GridBagLayout to create a board
#spanend
#spanadd
// https://community.oracle.com/thread/1357310
#spanend
#spanadd
// <guide-row>
#spanend
c.gridwidth = 1;
#spandel
//c.gridy = GridBagConstraints.REMAINDER;
#spanend
#spanadd
// c.gridy = GridBagConstraints.REMAINDER;
#spanend
for (c.gridx = 0; c.gridx <= WIDTH * XSIZE; c.gridx++) {
  panel.add(Box.createHorizontalStrut(24), c);
}
#spandel
//</dummy-row>
#spanend
#spanadd
// </guide-row>
#spanend
解説
上記のサンプルでは、GridBagLayoutを使ってJButtonをレンガ状に配置します。互い違いに2列ずつ占めるようにボタンを配置していますが、<dummy-row>が無い場合、うまくレンガ状にはなりません。
上記のサンプルでは、GridBagLayoutを使ってJButtonをレンガ状に配置します。互い違いに2列ずつ占めるようにボタンを配置していますが、<guide-row>が無い場合正しくレンガ状にはなりません。
以下、Swing - GridBagLayout to create a boardのDarryl.Burkeさんの投稿を引用
A column (or row) in a GridBagLayout is not well defined unless there is at least one component which occupies only that column (or row). All your rows have components spanning 2 columns.
列の基準となるガイド行は、どこでも(先頭でも最後でも)構わないようです。
- 同様に、ダミーの幅を持つガイド行を作成して
JButtonをキーボード風に配置するサンプル - 同様に指定した幅、かつ高さ
0のセルで構成されたガイド行を作成してJButtonをキーボード風に配置するサンプル