-
category: swing
folder: TexturePaint
title: TexturePaintを使って背景に画像を表示
tags: [TexturePaint, BufferedImage, Graphics2D]
author: aterai
pubdate: 2004-09-20
pubdate: 2004-09-20T16:06:29+09:00
description: TexturePaintを使用して背景にタイル状に画像を貼り付けます。
image:
概要
概要
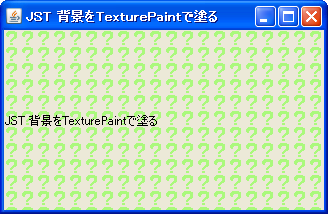
TexturePaintを使用して背景にタイル状に画像を貼り付けます。
Screenshot

サンプルコード
サンプルコード
#spandel
BufferedImage bi = null;
#spanend
#spandel
try {
#spanend
  bi = ImageIO.read(getClass().getResource("16x16.png"));
#spandel
} catch (IOException ioe) {
#spanend
  ioe.printStackTrace();
#spandel
}
#spanend
#spanadd
String path = "example/16x16.png";
#spanend
#spanadd
ClassLoader cl = Thread.currentThread().getContextClassLoader();
#spanend
#spanadd
BufferedImage bi = Optional.ofNullable(cl.getResource(path)).map(url -> {
#spanend
  try (InputStream s = url.openStream()) {
    return ImageIO.read(s);
  } catch (IOException ex) {
    ex.printStackTrace();
    return makeMissingImage();
  }
#spanadd
}).orElseGet(MainPanel::makeMissingImage);
#spanend
texture = new TexturePaint(bi, new Rectangle(bi.getWidth(), bi.getHeight()));
panel = new JPanel() {
  @Override public void paintComponent(Graphics g) {
    Graphics2D g2 = (Graphics2D) g;
  @Override protected void paintComponent(Graphics g) {
    Graphics2D g2 = (Graphics2D) g.create();
    g2.setPaint(texture);
    g2.fillRect(0, 0, getWidth(), getHeight());
    g2.dispose();
    super.paintComponent(g);
  }
}
View in GitHub: Java, Kotlin解説
このサンプルでは、BufferedImageからTexturePaintを生成し、これをGraphics2D#setPaintメソッドで設定してパネル全体を塗りつぶしています。
解説
-
BufferedImageを生成
- この
ImageをGraphics#drawImage(...)で描画するのではなく、TexturePaintを作成しGraphics2D#setPaintメソッドで設定してパネル全体の塗りつぶしを実行
参考リンク
参考リンク
コメント