Swing/CompoundButton のバックアップ(No.3)
- バックアップ一覧
- 差分 を表示
- 現在との差分 を表示
- 現在との差分 - Visual を表示
- ソース を表示
- Swing/CompoundButton へ行く。
- 1 (2012-11-26 (月) 15:04:48)
- 2 (2012-11-28 (水) 15:58:29)
- 3 (2012-12-05 (水) 18:24:20)
- 4 (2012-12-07 (金) 16:30:02)
- 5 (2013-01-28 (月) 02:16:22)
- 6 (2014-11-22 (土) 03:59:58)
- 7 (2014-11-23 (日) 16:59:11)
- 8 (2015-03-19 (木) 16:24:32)
- 9 (2016-12-30 (金) 18:51:42)
- 10 (2017-04-04 (火) 14:13:45)
- 11 (2017-07-06 (木) 13:41:58)
- 12 (2017-11-27 (月) 17:49:40)
- 13 (2018-02-24 (土) 19:51:30)
- 14 (2019-07-24 (水) 18:39:22)
- 15 (2019-09-13 (金) 15:04:45)
- 16 (2021-04-30 (金) 15:23:20)
- 17 (2025-01-03 (金) 08:57:02)
- 18 (2025-01-03 (金) 09:01:23)
- 19 (2025-01-03 (金) 09:02:38)
- 20 (2025-01-03 (金) 09:03:21)
- 21 (2025-01-03 (金) 09:04:02)
- 22 (2025-06-19 (木) 12:41:37)
- 23 (2025-06-19 (木) 12:43:47)
TITLE:OverlayLayoutで複数のJButtonを重ねて複合ボタンを作成
Posted by aterai at 2012-11-26
OverlayLayoutで複数のJButtonを重ねて複合ボタンを作成
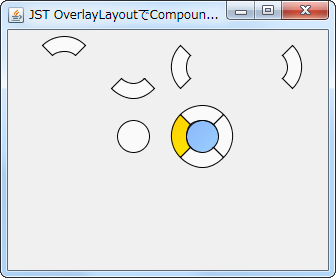
4つの扇形ボタンと円形ボタンを、OverlayLayoutを設定したJPanelに配置して、複合ボタンを作成します。
- &jnlp;
- &jar;
- &zip;
サンプルコード
private static JComponent makeCompoundButton(final Dimension d) {
  JPanel p = new JPanel() {
    @Override public Dimension getPreferredSize() {
      return d;
    }
  };
  p.setLayout(new OverlayLayout(p));
  p.add(new CompoundButton(d, ButtonLocation.NOTH));
  p.add(new CompoundButton(d, ButtonLocation.SOUTH));
  p.add(new CompoundButton(d, ButtonLocation.EAST));
  p.add(new CompoundButton(d, ButtonLocation.WEST));
  p.add(new CompoundButton(d, ButtonLocation.CENTER));
  return p;
}

class CompoundButton extends JButton {
  protected final Color fc = new Color(100,150,255,200);
  protected final Color ac = new Color(230,230,230);
  protected final Color rc = Color.ORANGE;
  protected Shape shape;
  protected Shape base = null;
  private final ButtonLocation bl;
  private final Dimension dim;
  public CompoundButton(Dimension d, ButtonLocation bl) {
    super();
    this.dim = d;
    this.bl = bl;
    setIcon(new Icon() {
      @Override public void paintIcon(Component c, Graphics g, int x, int y) {
        Graphics2D g2 = (Graphics2D)g.create();
        g2.setRenderingHint(RenderingHints.KEY_ANTIALIASING,
                  RenderingHints.VALUE_ANTIALIAS_ON);
        if(getModel().isArmed()) {
          g2.setColor(ac);
          g2.fill(shape);
        }else if(isRolloverEnabled() && getModel().isRollover()) {
          paintFocusAndRollover(g2, rc);
        }else if(hasFocus()) {
          paintFocusAndRollover(g2, fc);
        }else{
          g2.setColor(getBackground());
          g2.fill(shape);
        }
        g2.dispose();
      }
      @Override public int getIconWidth()  {
        return dim.width;
      }
      @Override public int getIconHeight() {
        return dim.height;
      }
    });
    setFocusPainted(false);
    setContentAreaFilled(false);
    setBackground(new Color(250, 250, 250));
    initShape();
  }
  @Override public Dimension getPreferredSize() {
    return dim;
  }
  protected void initShape() {
    if(!getBounds().equals(base)) {
      base = getBounds();
      float ww = getWidth() * 0.5f;
      float xx = ww * 0.5f;
      Shape inner = new Ellipse2D.Float(xx, xx, ww, ww);
      if(ButtonLocation.CENTER==bl) {
        shape = inner;
      }else{
        Shape outer = new Arc2D.Float(
          1, 1, getWidth()-2, getHeight()-2,
          bl.getStartDegree(), 90f, Arc2D.PIE);
        Area area = new Area(outer);
        area.subtract(new Area(inner));
        shape = area;
      }
    }
  }
  private void paintFocusAndRollover(Graphics2D g2, Color color) {
    g2.setPaint(new GradientPaint(0, 0, color,
                    getWidth()-1, getHeight()-1, color.brighter(), true));
    g2.fill(shape);
    g2.setColor(getBackground());
  }
  @Override protected void paintComponent(Graphics g) {
    initShape();
    super.paintComponent(g);
  }
  @Override protected void paintBorder(Graphics g) {
    Graphics2D g2 = (Graphics2D)g;
    g2.setRenderingHint(RenderingHints.KEY_ANTIALIASING,
              RenderingHints.VALUE_ANTIALIAS_ON);
    g2.setColor(getForeground());
    g2.draw(shape);
    g2.setRenderingHint(RenderingHints.KEY_ANTIALIASING,
              RenderingHints.VALUE_ANTIALIAS_OFF);
  }
  @Override public boolean contains(int x, int y) {
    //initShape();
    return shape.contains(x, y);
  }
}
解説
- 円形ボタン
- JButtonの形を変更を使って、幅高さの半分の直径をもつ円ボタンを作成
- JButton#contains(...)をオーバーライドして、図形内のみマウスカーソルが反応するように変更
- 扇形ボタン
- 東西南北に4つ配置するので、角の大きさは90度、始角はそれぞれ、45、135、225、-45度でArc2Dを作成
- これらのArc2Dから上記の円形ボタンの領域を取り去って扇形に変形(Area#subtract(Area)を使用)
- JButton#contains(...)をオーバーライドして、図形内のみマウスカーソルが反応するように変更
- 複合ボタン
- 5つのボタンを、OverlayLayoutを設定したJPanelに配置
- JPanel#getPreferredSize()をオーバーライドして、サイズが5つのボタンと同じになるように設定
