Swing/RootPaneBackground のバックアップ(No.2)
- バックアップ一覧
- 差分 を表示
- 現在との差分 を表示
- 現在との差分 - Visual を表示
- ソース を表示
- Swing/RootPaneBackground へ行く。
- 1 (2013-01-07 (月) 00:31:26)
- 2 (2013-09-06 (金) 00:04:38)
- 3 (2014-11-22 (土) 03:59:58)
- 4 (2014-11-25 (火) 03:03:31)
- 5 (2015-02-26 (木) 13:57:25)
- 6 (2015-04-01 (水) 20:10:14)
- 7 (2015-04-03 (金) 16:08:45)
- 8 (2017-02-28 (火) 13:08:52)
- 9 (2018-01-05 (金) 17:55:47)
- 10 (2019-12-26 (木) 16:54:34)
- 11 (2021-06-25 (金) 22:31:17)
- 12 (2025-01-03 (金) 08:57:02)
- 13 (2025-01-03 (金) 09:01:23)
- 14 (2025-01-03 (金) 09:02:38)
- 15 (2025-01-03 (金) 09:03:21)
- 16 (2025-01-03 (金) 09:04:02)
- 17 (2025-06-19 (木) 12:41:37)
- 18 (2025-06-19 (木) 12:43:47)
TITLE:JRootPaneの背景として画像を表示
Posted by aterai at 2013-01-07
JRootPaneの背景として画像を表示
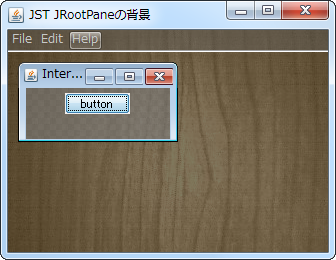
`JRootPane`の背景として画像を表示しています。
- &jnlp;
- &jar;
- &zip;
サンプルコード
JFrame frame = new JFrame("@title@") {
  @Override protected JRootPane createRootPane() {
    JRootPane rp = new JRootPane() {
      //private final TexturePaint texture = makeCheckerTexture();
      @Override protected void paintComponent(Graphics g) {
        super.paintComponent(g);
        Graphics2D g2 = (Graphics2D)g.create();
        g2.setPaint(texture);
        g2.fillRect(0, 0, getWidth(), getHeight());
        g2.dispose();
      }
      @Override public void updateUI() {
        super.updateUI();
        BufferedImage bi = makeBufferedImage("test.jpg");
        setBorder(new CentredBackgroundBorder(bi));
        setOpaque(false);
      }
    };
    return rp;
  }
};
//frame.getRootPane().setBackground(Color.BLUE);
//frame.getLayeredPane().setBackground(Color.GREEN);
//frame.getContentPane().setBackground(Color.RED);
((JComponent)frame.getContentPane()).setOpaque(false);
frame.setJMenuBar(createMenubar());
frame.getContentPane().add(new MainPanel());
解説
このサンプルでは、`JFrame#createRootPane()メソッドをオーバーライドして、以下の方法で背景に画像を描画するJRootPane`を作成しています。
- 中央の画像: CentredBackgroundBorderを使用
- チェック柄: `
JRootPane#paintComponent(...)`をオーバーライド
- `
JRootPane`の子コンポーネントの透明化、半透明化- `
ContentPane:setOpaque(false);`で透明化 - `
JDesktopPane:setOpaque(false);`で透明化- 参考: JInternalFrameを半透明にする
- `
NimbusLookAndFeel`には未対応
- `
JMenuBar:setOpaque(false);で透明化し、JMenuBar#paintComponent(...)`をオーバーライドして半透明化 - `
JMenu,JMenuItemなど:setOpaque(false);で透明化、LookAndFeelによって、JMenu#setBackground(new Color(0,0,0,0));、UIManager.put("Menu.selectionBackground", new Color(0,0,100,100));`などを使用 - `
JPopupMenu`: JMenuなどから開くPopupMenuを半透明化などで、半透明化
- `
