Swing/ButtonInComboEditor のバックアップ(No.8)
- バックアップ一覧
- 差分 を表示
- 現在との差分 を表示
- 現在との差分 - Visual を表示
- ソース を表示
- Swing/ButtonInComboEditor へ行く。
- 1 (2009-08-17 (月) 12:55:55)
- 2 (2009-08-28 (金) 16:42:47)
- 3 (2009-09-06 (日) 12:30:46)
- 4 (2010-03-08 (月) 12:30:37)
- 5 (2010-03-08 (月) 13:45:10)
- 6 (2010-12-13 (月) 00:06:58)
- 7 (2011-10-28 (金) 15:40:35)
- 8 (2012-10-20 (土) 04:29:14)
- 9 (2013-01-06 (日) 21:35:41)
- 10 (2013-01-07 (月) 02:02:52)
- 11 (2014-10-30 (木) 00:21:42)
- 12 (2014-10-30 (木) 11:07:56)
- 13 (2014-11-30 (日) 00:53:14)
- 14 (2016-02-18 (木) 15:52:55)
- 15 (2017-07-11 (火) 15:12:09)
- 16 (2018-02-24 (土) 19:51:30)
- 17 (2018-03-12 (月) 19:28:19)
- 18 (2018-03-20 (火) 15:15:53)
- 19 (2018-12-19 (水) 20:40:45)
- 20 (2020-11-14 (土) 16:52:49)
- 21 (2022-12-01 (木) 10:41:28)
- 22 (2025-01-03 (金) 08:57:02)
- 23 (2025-01-03 (金) 09:01:23)
- 24 (2025-01-03 (金) 09:02:38)
- 25 (2025-01-03 (金) 09:03:21)
- 26 (2025-01-03 (金) 09:04:02)
- 27 (2025-06-19 (木) 12:41:37)
- 28 (2025-06-19 (木) 12:43:47)
TITLE:JComboBoxのEditorComponentにJButtonを配置
Posted by aterai at 2009-08-17
JComboBoxのEditorComponentにJButtonを配置
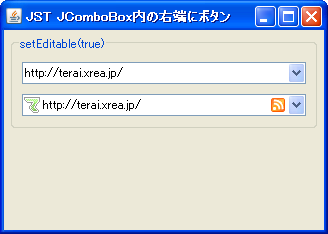
JComboBoxのEditorComponentにJButtonやJLabelなどを配置します。
- &jnlp;
- &jar;
- &zip;
サンプルコード
combo02.setLayout(new LayoutManager() {
  @Override public void addLayoutComponent(String name, Component comp) {}
  @Override public void removeLayoutComponent(Component comp) {}
  @Override public Dimension preferredLayoutSize(Container parent) {
    return parent.getPreferredSize();
  }
  @Override public Dimension minimumLayoutSize(Container parent) {
    return parent.getMinimumSize();
  }
  @Override public void layoutContainer(Container parent) {
    if(!(parent instanceof JComboBox)) return;
    JComboBox cb   = (JComboBox)parent;
    int width    = cb.getWidth();
    int height     = cb.getHeight();
    Insets insets  = cb.getInsets();
    int buttonHeight = height - (insets.top + insets.bottom);
    int buttonWidth  = buttonHeight;
    int labelWidth   = buttonHeight;
    int loupeWidth   = buttonHeight;

    JButton arrowButton = (JButton)cb.getComponent(0);
    if(arrowButton != null) {
      Insets arrowInsets = arrowButton.getInsets();
      buttonWidth = arrowButton.getPreferredSize().width
        + arrowInsets.left + arrowInsets.right;
      arrowButton.setBounds(width - (insets.right + buttonWidth),
                            insets.top, buttonWidth, buttonHeight);
    }
    if(label != null) {
      Insets labelInsets = label.getInsets();
      labelWidth = label.getPreferredSize().width
        + labelInsets.left + labelInsets.right;
      label.setBounds(insets.left, insets.top, labelWidth, buttonHeight);
    }
    JButton rssButton = button;
    if(rssButton != null && rssButton.isVisible()) {
      Insets loupeInsets = rssButton.getInsets();
      loupeWidth = rssButton.getPreferredSize().width
        + loupeInsets.left + loupeInsets.right;
      rssButton.setBounds(width - (insets.right + loupeWidth + buttonWidth),
                          insets.top, loupeWidth, buttonHeight);
    }else{
      loupeWidth = 0;
    }

    Component editor = cb.getEditor().getEditorComponent();
    if ( editor != null ) {
      editor.setBounds(insets.left + labelWidth, insets.top,
        width -(insets.left+insets.right+buttonWidth+labelWidth+loupeWidth),
        height-(insets.top +insets.bottom));
    }
  }
});
解説
上記のサンプルでは、setBorderメソッドで作成した余白の上に、 JComboBoxに独自のレイアウトマネージャを設定して、JButtonやJLabelを配置しています。
RolloverIconは、元のアイコンに以下のようなフィルタを掛けて作成しています。
private static ImageIcon makeFilteredImage(ImageIcon srcIcon) {
  RGBImageFilter filter = new SelectedImageFilter();
  FilteredImageSource fis = new FilteredImageSource(srcIcon.getImage().getSource(), filter);
  return new ImageIcon(Toolkit.getDefaultToolkit().createImage(fis));
}
static class SelectedImageFilter extends RGBImageFilter {
  public SelectedImageFilter() {
    canFilterIndexColorModel = true;
  }
  private final float scale = 1.2f;
  public int filterRGB(int x, int y, int argb) {
    //int a = (argb >> 24) & 0xff;
    int r = (argb >> 16) & 0xff;
    int g = (argb >> 8)  & 0xff;
    int b = (argb)       & 0xff;
    r = (int)(r*scale);
    g = (int)(g*scale);
    b = (int)(b*scale);
    if(r > 255) r = 255;
    if(g > 255) g = 255;
    if(b > 255) b = 255;
    return (argb & 0xff000000) | (r<<16) | (g<<8) | (b);
  }
}
// private static ImageIcon makeFilteredImage2(ImageIcon srcIcon) {
//   RescaleOp op = new RescaleOp(
//       new float[] { 1.2f,1.2f,1.2f,1.0f },
//       new float[] { 0f,0f,0f,0f }, null);
//   BufferedImage img = new BufferedImage(
//       srcIcon.getIconWidth(), srcIcon.getIconHeight(), BufferedImage.TYPE_INT_ARGB);
//   Graphics g = img.getGraphics();
//   //g.drawImage(srcIcon.getImage(), 0, 0, null);
//   srcIcon.paintIcon(null, g, 0, 0);
//   g.dispose();
//   return new ImageIcon(op.filter(img, null));
// }
参考リンク
コメント
- EditorComponentに追加したJButtonをクリックすると例外が発生する場合があるバグを修正 -- aterai
