Swing/BlurButton のバックアップ(No.13)
- バックアップ一覧
- 差分 を表示
- 現在との差分 を表示
- 現在との差分 - Visual を表示
- ソース を表示
- Swing/BlurButton へ行く。
- 1 (2013-12-09 (月) 00:54:27)
- 2 (2013-12-09 (月) 13:53:21)
- 3 (2013-12-12 (木) 17:35:41)
- 4 (2014-06-03 (火) 21:26:53)
- 5 (2014-09-30 (火) 01:24:50)
- 6 (2015-01-23 (金) 19:23:11)
- 7 (2016-06-17 (金) 19:44:47)
- 8 (2016-06-17 (金) 22:01:53)
- 9 (2017-09-17 (日) 18:10:39)
- 10 (2018-02-27 (火) 14:26:14)
- 11 (2018-06-02 (土) 16:48:33)
- 12 (2020-04-08 (水) 16:07:26)
- 13 (2021-10-19 (火) 12:56:20)
- 14 (2024-07-18 (木) 02:20:45)
- 15 (2025-01-03 (金) 08:57:02)
- 16 (2025-01-03 (金) 09:01:23)
- 17 (2025-01-03 (金) 09:02:38)
- 18 (2025-01-03 (金) 09:03:21)
- 19 (2025-01-03 (金) 09:04:02)
- 20 (2025-06-19 (木) 12:41:37)
- 21 (2025-06-19 (木) 12:43:47)
- category: swing
folder: BlurButton
title: ConvolveOpでコンポーネントにぼかしを入れる
tags: [JButton, ConvolveOp, BufferedImage]
author: aterai
pubdate: 2013-12-09T00:54:27+09:00
description: ConvolveOpを使って、使用不可状態のJButtonにぼかしを入れます。
image:

概要
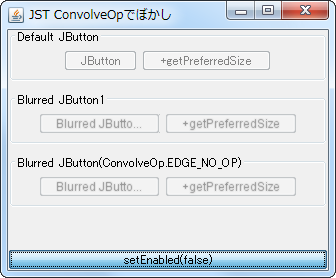
ConvolveOpを使って、使用不可状態のJButtonにぼかしを入れます。
Screenshot

Advertisement
サンプルコード
class BlurButton extends JButton {
  private final ConvolveOp op = new ConvolveOp(
      new Kernel(3, 3, new float[] {
    .05f, .05f, .05f,
    .05f, .60f, .05f,
    .05f, .05f, .05f
  }), ConvolveOp.EDGE_NO_OP, null);
  private BufferedImage buf;
  public BlurButton(String label) {
    super(label);
    // System.out.println(op.getEdgeCondition());
  }
  @Override protected void paintComponent(Graphics g) {
    if (isEnabled()) {
      super.paintComponent(g);
    } else {
      int w = getWidth();
      int h = getHeight();
      buf = Optional.ofNullable(buf)
          .filter(bi -> bi.getWidth() == w && bi.getHeight() == h)
          .orElseGet(() -> new BufferedImage(w, h, BufferedImage.TYPE_INT_ARGB));
      Graphics2D g2 = buf.createGraphics();
      g2.setFont(g.getFont()); // pointed out by 八ツ玉舘
      super.paintComponent(g2);
      g2.dispose();
      g.drawImage(op.filter(buf, null), 0, 0, null);
    }
  }
  // @Override public Dimension getPreferredSize() {
  //   Dimension d = super.getPreferredSize();
  //   d.width += 3 * 3;
  //   return d;
  // }
}
解説
- 上
- デフォルトの
JButton
- デフォルトの
- 中
ConvolveOpを使って、使用不可状態のJButtonにぼかし- Java Swing Hacks 9. 使用不可状態のコンポーネントをぼかし表示するから引用
- 下
WindowsLookAndFeelの場合、右端1ドットの表示が乱れる場合があるので、EdgeConditionをデフォルトのEDGE_ZERO_FILLから、EDGE_NO_OPに変更WindowsLookAndFeelの場合、これらのぼかしを入れると文字が拡大されて?(左右のBorderが広いから?)、文字列が省略されてしまうので、JButton#getPreferredSize()をオーバーライドして幅を拡大- コメントで八ツ玉舘さんから指摘があり、文字が拡大されるのは
BufferedImageから生成したGraphicsとコンポーネントのGraphicsで異なるフォントが設定されていることが原因と判明 g2.setFont(g.getFont());を使用するよう修正
- コメントで八ツ玉舘さんから指摘があり、文字が拡大されるのは
参考リンク
- ConvolveOp (Java Platform SE 8)
- 5.8.1 イメージ処理操作の使用方法
- Java Image Processing - Blurring for Beginners
- Java Swing Hacks 9. 使用不可状態のコンポーネントをぼかし表示する