概要
概要
JToolBarに、長押しでJPopupMenu、クリックで選択されたメニューを表示するボタンを追加します。
Screenshot

サンプルコード
サンプルコード
class PressAndHoldHandler extends AbstractAction implements MouseListener {
  public final JPopupMenu pop = new JPopupMenu();
  public final ButtonGroup bg = new ButtonGroup();
  private AbstractButton arrowButton;
  private final Timer holdTimer = new Timer(1000, new ActionListener() {
    @Override public void actionPerformed(ActionEvent e) {
      System.out.println("InitialDelay(1000)");
      if (arrowButton != null && arrowButton.getModel().isPressed()
          && holdTimer.isRunning()) {
        holdTimer.stop();
        pop.show(arrowButton, 0, arrowButton.getHeight());
        pop.requestFocusInWindow();
      }
    }
  });
#spanadd

#spanend
  public PressAndHoldHandler() {
    super();
    holdTimer.setInitialDelay(1000);
    pop.setLayout(new GridLayout(0, 3, 5, 5));
    for (MenuContext m: makeMenuList()) {
      AbstractButton b = new JRadioButton(m.command);
      b.setActionCommand(m.command);
      b.setForeground(m.color);
      b.setBorder(BorderFactory.createEmptyBorder());
      b.addActionListener(new ActionListener() {
        @Override public void actionPerformed(ActionEvent e) {
          System.out.println(bg.getSelection().getActionCommand());
          pop.setVisible(false);
        }
      });
      pop.add(b);
      bg.add(b);
    }
  }
#spanadd

#spanend
  private List<MenuContext> makeMenuList() {
    return Arrays.asList(
      new MenuContext("BLACK",   Color.BLACK),
      new MenuContext("BLUE",  Color.BLUE),
      new MenuContext("CYAN",  Color.CYAN),
      new MenuContext("GREEN",   Color.GREEN),
      new MenuContext("BLACK", Color.BLACK),
      new MenuContext("BLUE", Color.BLUE),
      new MenuContext("CYAN", Color.CYAN),
      new MenuContext("GREEN", Color.GREEN),
      new MenuContext("MAGENTA", Color.MAGENTA),
      new MenuContext("ORANGE",  Color.ORANGE),
      new MenuContext("PINK",  Color.PINK),
      new MenuContext("RED",   Color.RED),
      new MenuContext("YELLOW",  Color.YELLOW));
      new MenuContext("ORANGE", Color.ORANGE),
      new MenuContext("PINK", Color.PINK),
      new MenuContext("RED", Color.RED),
      new MenuContext("YELLOW", Color.YELLOW));
  }
#spanadd

#spanend
  @Override public void actionPerformed(ActionEvent e) {
    System.out.println("actionPerformed");
    if (holdTimer.isRunning()) {
      ButtonModel model = bg.getSelection();
      if (model != null) {
        System.out.println(model.getActionCommand());
      }
      holdTimer.stop();
    }
  }
#spanadd

#spanend
  @Override public void mousePressed(MouseEvent e) {
    System.out.println("mousePressed");
    Component c = e.getComponent();
    if (SwingUtilities.isLeftMouseButton(e) && c.isEnabled()) {
      arrowButton = (AbstractButton) c;
      holdTimer.start();
    }
  }
#spanadd

#spanend
  @Override public void mouseReleased(MouseEvent e) {
    holdTimer.stop();
  }
#spanadd

#spanend
  @Override public void mouseExited(MouseEvent e) {
    if (holdTimer.isRunning()) {
      holdTimer.stop();
    }
  }
  @Override public void mouseEntered(MouseEvent e) { /* not needed */ }
  @Override public void mouseClicked(MouseEvent e) { /* not needed */ }
#spanadd

#spanend
  @Override public void mouseEntered(MouseEvent e) {
    /* not needed */
  }
#spanadd

#spanend
  @Override public void mouseClicked(MouseEvent e) {
    /* not needed */
  }
}
View in GitHub: Java, Kotlin解説
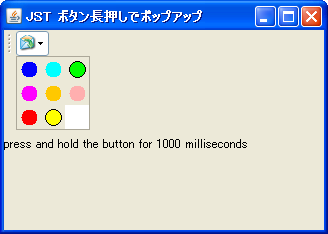
上記のサンプルでは、1000ミリ秒ボタンを押したままにしておくと、JRadioButtonを配置したJPopupMenuを表示します。普通にクリックした場合は、現在選択されているJRadioButtonの色をコンソールに出力するようになっています。
解説
- 長押し
- ボタンクリックが
1000ミリ秒以上継続するとJRadioButtonを配置したJPopupMenuを表示
-
JPopupMenuのレイアウトをpop.setLayout(new GridLayout(0, 3))で変更しJRadioButtonを3列並べて表示
- シングルクリック
- 現在選択されている
JRadioButtonの色をコンソールに出力
- -
JPopupMenuのレイアウトをpop.setLayout(new GridLayout(0,3));で変更し、三列にJRadioButtonを並べています。
参考リンク
コメント
 hreflang: